
Martybugs.net 11dBi Biquad
Martin of martybugs.net has a great tutorial for building an 11dBi gain biquad WiFi antenna. You can follow his instructions here. Comparable gain antennas typically sell for around $100 U.S. The cost of materials used for Martin’s biquad should be around $15 U.S. Not a bad deal considering that you can build one in an afternoon.
I have built a number of biquads based on his design and done extensive practical testing. I’d like to share these insights with you. Study Martin’s tutorial and come back here for several tips that will make the construction and use easier.
Connecting the antenna to a computer
The antenna is going to boost your signal a lot. I have logged into a public hotspot from 23km (17m) using only the biquad in a moving vehicle! To be fair, I was in a rural area on a hill overlooking a small town. There was little in the way of interference from other microwave sources. The connection was not particularly good but 23km is unthinkable for stock antennas that come with consumer networking equipment.
When I first looked into the building one of these I didn’t quite understand how to connect the antenna to the computer. You can tap straight into your network card or motherboard. This is not for the faint of heart. You can cause permanent damage by soldering pieces onto your motherboard. A far easier solution in case of a laptop computer is to get a PCMCIA wireless card with an external antenna connector. I have a Buffalo WiFi card that works very well. Even without an external antenna it’s much more sensitive than my older Linksys cards.
To properly connect the wireless card to the biquad you will need a short adaptor cable called “pigtail.” Ebay is a great place for finding the right pigtail for your application. The cable is not particularly expensive. When purchasing one consider that that signal loss is proportional to the length of the pigtail. Choose as short of a pigtail as practical.
Sourcing the biquad antenna parts
The materials for the biquad are simple: copper wire, printed circuit board (PCB), copper pipe, coaxial cable and “N” type connector.
Depending on your locale you may have to mail order some of these parts. HAM radio stores and radio amateur swap meets are great places to get the stuff. Ebay is also a good place but expect to pay more because of shipping costs for individual items. I have ordered biquad kits on Ebay at a price that beats getting all components separately.
Along with microwave cable the “N” connector is probably the hardest piece to find. Special low loss microwave LMR 400 cable is recommended but the length of cable used in the antenna is so short that any 50 Ohm cable will work just fine.
Tools
Cutting copper pipe is a slow process unless you have a good metal saw. Another tool of great importance is the soldering iron.
You will need a lot of heat because of the heat dissipation in the large metal mass you are trying to soldier. My electric soldering iron was not working for this at all and I used a small butane torch from Radio Shack. I love this tool! It’s very versatile because it doubles as a soldering iron and there are no cables dangling.
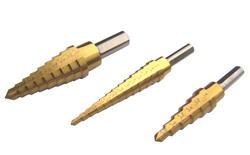
Drilling the PCB is very easy but you will need a range of drill bits to build up the hole size for the copper pipe to fit through. One type of drill bit I find particularly useful for this type of work is called step bit [Fig. 1].
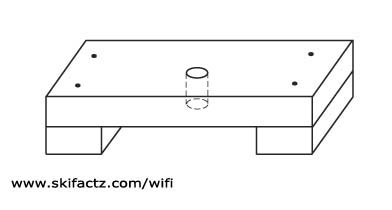
If you don’t have access to a good vise you can make a simple hands-free rig out of a short wood board. Drill a hole just barely tighter than the copper pipe in the middle of the board. Cut two short board pieces for feet and nail the board with a hole on top of them [Fig. 2].
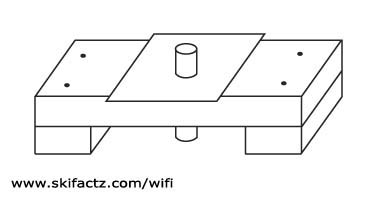
This tool will allow you to jam the copper pipe tight into the wood and lay the PCB at a perfect 90 degrees angle [Fig. 3]. The metal pieces will get very hot during soldiering. Wear work gloves or avoid touching metal while hot.
Once you are finished building the biquad you may consider placing it in an enclosure for protection. See the enclosure building instructions.
Wonderful ideas guys. Could you send me detailed information on the construction of this simple wifi gadget from top to connecting to a laptop at mugey74@yahoo.com