
Make Cheap Calls with a mobile WiFi Telephone
Even my mother knows about Skype. It allows you to make cheap domestic and international calls and free calls to other Skype users. What my mother doesn’t know is that Skype may not be the best VOIP solution out there.
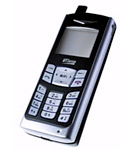
In this tutorial we’ll learn how to setup a dirt cheap non-Skype internet telephone [Fig. 1]. The instructions apply to UTStarcom F1000G and F3000 models. Both models have identical menus.
I have several requirements for this project. First, I want a physical phone that I can carry around with me and make calls. Second, I want good sound quality and inexpensive rates to international destinations (at least as inexpensive as Skype). Third, I want to be able to make free internet-only calls to any standard VOIP phone.
Anyone can benefit from this setup but it is especially useful to people with family members in many different countries and small companies with a virtual office and employees all over the world.
Cost and Time
How expensive is this solution? A new WiFi phone will cost you from $120-200 USD on the Internet. Calling plans usually have no setup fee and you can start making landline calls with as little as several dollars balance on the account.
Prepare to spend 1-2 hours setting up your first phone and account. Once you get a sense how it works you’ll be able to do it in 10 minutes.
I knew nothing about the technology a month ago. By the time you finish reading this you’ll know as much as I do now.
VOIP Basics
Let’s review how all this works. VOIP stands for “Voice Over Internet Protocol.” It can be implemented in many ways but in the nutshell if communication between two telephones travels over the internet there is VOIP in play. The two phones need not have a 100% internet connection between them. You may have made VOIP calls without even knowing it. Inexpensive phone companies often use VOIP to deliver cheap rates to customers. You and the party you are calling may be using 70’s rotary phones but some part of the traffic between these two units is routed through the internet.
The advantage of VOIP is that more calls can be shoved through the pipe. Where an analog line could handle a limited number of calls a VOIP route can push many more calls through. This brings the cost down.
It doesn’t matter where you are in the world. Your calls will always cost the same and people will always be able to call you at your local number(s) regardless of your location.
It is important to consider that a setup described here is not a replacement for your regular phone. You can not make emergency 911 calls from this type of phone. There will also be many times when you are completely out of WiFi range and the phone is dead.
Glossary
Some terms will keep coming up so let’s review them:
| Hardphone | This is a physical VOIP phone. Something you can hold in your hand. |
| Softphone | A software VOIP phone. Think of Skype’s interface for example. |
| SIP | Session Initiatiation Protocol. The most common VOIP standard. |
| Termination | Outgoingcall. |
| Origination | Incoming call. |
| DID | Your own telephone number that can be dialed from any old phone. |
| AP | Access Point. A wireless router WiFi phone can connect to. |
Equipment
The only two pieces of equipment you will need are a SIP compliant WiFi phone and a computer. The computer is only used for initial setup and is not required on an ongoing basis other than to add money to your account. However, you can also use the computer to make and receive calls if you wish.
While there are tons of wired VOIP phones for use in office environments there are literally fewer than ten mobile WiFi phones available on the market. Most are designed for office use within well functioning wireless networks. Just about all of them have terrible user reviews.
The cheapest of the pack — Utstarcom F1000 and F1000G [Fig. 1] retail for about $110 (USD) but you can often find used ones cheaper on eBay. The “G” version is designed to work with both “b” and “g” type wireless networks which is not a significant advantage for VOIP.
The unit has very little terms of features we expect today. There is no color screen, no fancy ringtones, no camera, and no MP3 player. It is relatively small but it looks like a late 90’s Nokia. However, it has a significant advantage over the competition. This phone will roam between APs as you move around without dropping a call. Better yet, it will auto connect to any unlocked AP if the signal is strong enough. This means that you can take the phone with you out of the house and make calls from places with unlocked hotspots or unlocked municipal networks. You can also connect to locked (WEP/WPA) APs as long as you have the password.
One feature that’s lacking is a web browser. Without a browser it is difficult to log into hotspots that require authentication. The phone supports use of authentication scripts which must be written using a special application and loaded onto the phone in advance. This may not be rocket science but it’s hardly worth the time. There is one phone with a browser — Linksys WIP330 but it has such poor reviews that I don’t dare fork out over $200 (USD) for it.
Enough talk. Let’s do it.
STEP 1 – Download a Softphone
A softphone is not necessary but it will simplify testing procedure quite a bit. One of the best out there is X-Lite. Follow the installation instructions.
STEP 2 – Open a SIP Account
This is like signing up with a cell phone carrier except that there aren’t crazy contract commitments. There are many SIP providers out there. If there are setup fees I’d look the other way. Usually they’ll let you get started with a small balance transfer from a PayPal account or a credit card. I’m talking about just a few bucks. Some will even allow you to make free calls for testing purposes.
One thing that’s very different from signing up with a cell phone company is that when you open a SIP account you get the ability to call and receive calls from other SIP users (similar to Skype to Skype) and the ability to call regular phones (termination). If you want to be able to receive calls from regular phones you need DID which is billed separately and can be actuated through another provider. More about this later.
Check out the rates for the places you will be calling. Remember that switching providers later is very easy.
I ended up testing several providers. Cheapskates may want to consider www.voipcheap.com. They offer “free” calls to select countries and overall cheap rates. The way the “free” calls work is somewhat complicated. You make an initial payment of €10. After that you can call for free for 90 days. After 90 days they start applying standard rates to your calls and depleting your balance. At that point you can sink in another €10 and start a new 90 day period.
The thing that bugs me about voipcheap is that you have to download and install their Skype-like softphone in order to create a SIP account. Their softphone is absolutely non-essential. It’s just a hassle. I downloaded it, installed it, wrote down my SIP account information and uninstalled the software.
Another provider worth mentioning is www.callwithus.com. They have a nonsense-free setup and a very functional web interface used to configure your account settings. The rates are pretty low too. You can setup multiple numbers (SIP user names) under one account for no extra charge.
Explore other options your provider may offer such as voice mail, conference calling, etc.
STEP 3 – Setup Softphone and Make a Test Call
Whichever service you sign up with they’ll provide you with standard information used to setup your softphone/hardphone. For example voipcheap SIP information is as follows:
| SIP port | 5060 |
| Registrar | sip.VoipCheap.com |
| Proxy server | sip.VoipCheap.com |
| Outbound proxy server | leave empty |
| Account name | your VoipCheap username |
| Password | your VoipCheap password |
| Display name/number | your VoipCheap username or voipnumber |
| Stunserver (option) | stun.VoipCheap.com |
In most cases it comes down to just the parameters in bold text.
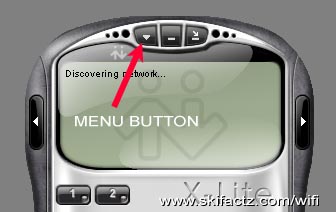
Let’s setup X-Lite for use with Callwithus. Assuming that you have already opened an account and have your user name and password available start the X-Lite and click on the triangular icon button top left [Fig 2].
Choose “SIP Account Settings” and click on “Add.” Use this information from callwithus to complete your settings. Substitute your user name and password. “Display Name” is like a caller ID for SIP-to-SIP calls. “Authorization User Name” should be the same as your “User Name.” Note that user name is different from your callwithus account number. The user name is like your telephone number and callwithus allows you to have more than one user name under a single account.
When done click on “OK” and “Close” to get back to your X-Lite panel. The phone will connect to the server and say “Ready.” Test it by calling yourself. Because the SIP server doesn’t necessarily know where you are you always have to dial the country code first. To call a U.S. number (202) 555-1212 you’d have to dial this sequence: 12025551212.
STEP 4 – Setup an Incoming Telephone Number
You can purchase one or more incoming numbers (DID) from www.callwithus.com or most other SIP providers. Wait, multiple numbers all funneling to the same unit?
Yes. This feature is gold for business users who like to have local numbers where their clients are. Also if you’re looking for work in another state you could get a local number for couple of bucks a month to make an appearance that you’re local. You can get inexpensive 800 numbers too. It gets even better, read on.
You can get a 100% free incoming phone number in Washington State at www.ipkall.com. Why are they handing out free numbers? I have no idea. Maybe they are all routed through NSA supercomputers. The setup is simple. You give ipkall your email, SIP server address and your SIP user name. They hand you out a phone number. Within 60 minutes you are ready to receive calls. Test it is soon as 10 minutes later. It kicks in pretty quick. Call and your X-Lite will ring as long as it is connected.
STEP 5 – Setup Hardphone
All this exercise with X-Lite was to ensure your account is working and there aren’t any blocked ports in your router that could prevent SIP from going through your firewall. Once you’re comfortable with the softphone it’s time to move onto your new hardphone.
Utstarcom F1000 and F1000G have identical user interfaces so it doesn’t matter at all which one you have.
There are two “stages” to any WiFi phone’s connectivity. First it must be connected to your wireless router like a laptop computer. Once that is achieved it must connect to the SIP server in order to send and receive calls.
Initially your phone screen will probably say “No service try other AP.” To connect to your router for the first time press the SEARCH key (right softkey under the phone screen). After several seconds the names of all available wireless networks will come on screen. Chose your network and press the “Save” softkey. The screen will change giving you 4 slots where this network can be saved. Pick slot number 1 and save.
If you use no WEP/WPA protection you can up-arrow twice and press OK when “Activate” is selected. This will connect the phone to your network.
If you use protection down-arrow to “Security Mode” and chose whichever is appropriate “WEP Key Info” or “WPA PSK Info.” A prompt will ask you to “Enter Code.” The code is “888888” — your phone’s password. The next step is to enter your router’s WEP or WPA password. Exit and go to “Activate” and your phone should connect to the router.
If you fail to connect power cycle the phone and verify that all menu settings you just entered are correct.
We’re connected to your network now but still can’t make calls because the phone is not setup to register with the provider’s SIP server yet.
With the phone connected to the router we can edit the menus through a web browser on your computer which is a lot easier than thumbing on the phone. To do this we must determine the F1000’s IP address. The easiest way to do this is to press the MENU key from the phone’s main menu. Press up-arrow key three times until you get to “WiFi-Settings” and click OK. Down-arrow to “Network Parameter” and press OK. Up-arrow once and press OK to enter “Network Information.” IP address of the phone will be listed right at the top.
Copy this number into your web browser’s address field [Fig. 3] and the phone configuration menu will come up. Login as “user” with “888888” password. Your computer must be connected to the same network as the phone in order to achieve this.
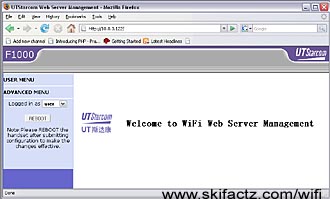
Enter “USER MENU” on the left [Fig 4].
The only two submenus of immediate interest are “SIP and RTP Config” and “STUN Config.” Use this cheat sheet [LINK] to setup your parameters.
Click on “REBOOT” and the phone will restart. Allow about a minute for it to connect and register and make a test call. You can dial 3246 if using www.callwithus.com to start an echo test. Anything you say will be repeated to you free of charge. It’s great for kids!
STEP 6 – Making SIP Calls
If you have several of these phones or if you know someone with a SIP account you can bypass the traditional phone network and call them directly. These calls are free. In order to call someone who has a SIP account with the same provider as you just dial their number (SIP user name). SIP user names sometimes contain letters which can not be dialed from Utstarcom F1000/F1000G.
Dialing a SIP number serviced by another provider is not easy to do on F1000/F1000G because of the standard syntax: UserName@SipServer.com Even if the user name contains numbers only “@” and “.” can not be typed into the phone. However, all these calls can be easily initiated through X-Lite.
As limited as F1000’s dialing abilities are it is still useful to setup two or more phones under one SIP provider so you can make direct VOIP calls between them. If you have family members or co-workers in multiple countries this is a great way to stay in touch.
Troubleshooting
Your X-Lite installation is a great diagnostic tool should something go wrong. If you can make and receive calls from the softphone but not from Utstarcom F1000G it means that your hardphone settings are wrong.
Check if the phone is connected to the router first. If so, look at error messages on the home screen of the phone. Absence of any message usually means that the phone is connected to the AP and registered with the SIP server.
Blocked ports in your router are a common problem. Check with your SIP provider which port number(s) are used. Usually it is port 5060. Verify your router settings to see if the port is blocked which is sometimes done for security purposes. If you’re unsure how to do this but would still like to test the phone just take a walk with the phone and see if you can register through any unprotected WiFi networks on the street. The word is that this is illegal in some U.S. states. I don’t know whether this is true but if you just connect and register the impact on the bandwidth is minimal.
A Word on Skype
At the beginning I said that Skype may not be the best VOIP solution out there. Here’s why.
While Skype offers good rates and decent call quality it has several shortcomings. It is not SIP compliant which means that you can not easily connect to a much greater pool of telephone users who are SIP compliant.
Unlike using a SIP device where you can switch a provider with a few clicks of a mouse if you dislike the rates there is no alternative to Skype rates. Skype phone uses Skype proprietory technology and third party companies are excluded from competing and bringing less expensive rates.
Skype is based on peer-to-peer networking which means that when your phone is online calls could be routed through your computer even if you’re not talking on the phone. This takes up your bandwidth.