All posts by Hakr

Sony Ericsson T715 DIY External Antenna

Turn your phone into a transistor radio
Sony Ericsson T715 with external antenna modification
external antenna for cell phone

Sony Ericsson T715a comes with a built in FM radio. I love this little phone. In order to use the radio, even if you intend to play through the speaker, you need to plug in the headset because the headset cable acts as an FM antenna.

The phone won’t even play the audio through the speaker if it detects that the headset is not plugged in. That bothered me so I built this antenna mod.

First you need to buy a very cheap adapter that converts the multipin connector to 3.5 mm mini plug. In some cases that’s possibly all you need. When you plug in the adapter the phone will be fooled thinking the headset is plugged in and will allow you to play the sound through the speaker.

However, the signal quality won’t be great without an antenna so you need a piece of thick wire cut to about 40 cm length (1/8th of the wavelength for the bottom of the FM dial). Simply solder the wire to either a stereo or mono mini plug. I used a stereo plug and it seemed that any of the three connectors produced equally good static-free sound. I was just careful not to soldier to more than one connector. Insert the mini connector into the adapter and you’re good to go.

UTStarcom GF210 Review

Dual mode GSM/VoIP mobile telephone


The much anticipated UTStarcom GF210 dual GSM/VoIP phone has arrived to the shelves or U.S. retailers in time for the Christmas shopping season. The initial delay and renaming of the phone from GF200 to GF210 are attributed to last minute engineering challenges.

The mobile phone will be battle tested in the coming months and we expect to expand this review as new data come in. One thing is certain — UTStarcom GF210 boldly follows the footsteps of trendsetting WiFi VoIP predecessors F1000g and F3000.

What is so special about this telephone? It integrates two technologies in one. It is a GSM tri-band mobile phone and a WiFi VoIP phone in one slick package. Today’s smartphones also combine the two technologies but a couple of things set the GF210 apart.

The first thing is the price. The phone retails for around $250 U.S. which is half the price of most smartphones.

The second thing is the integration of the WiFi phone into the physical hardware. Smartphones require download and installation of SIP capable clients like Gizmo Project in order to make calls over the Internet. UTStarcom GF210 does not require installation of any additional VoIP software. It is ready to go straight out of the box.

Fixed Mobile Convergence technology behind this unit allows for seamless call handover between the GSM and VoIP.

This is a money saving feature which allows the phone to always select the least expensive calling option. Let’s say you initiate a call in your office. The call is routed as a VoIP call through the Internet. As you leave your office and drop the Internet connection the GSM network kicks in. As you sit down to have lunch at a coffee shop with free Internet access the unit switches back to VoIP which is cheaper than cellular call. You get the picture.

However, no U.S. mobile carriers offer support for this technology yet.

The WiFi side of UTStarcom GF210 is a further refinement of hardware that powers F1000g and F3000 phones. Both are very reliable, offer solid voice quality and superior access point roaming and auto scan capabilities.
Many WiFi VoIP phones fall short once removed outside of their familiar environment. They typically need manual reconfiguration in order to connect to each new AP.

UTStarcom’s answer to this problem is a powerful auto scan feature that scans and connects to the strongest open network available. This effectively means that you can use hands off approach. The phone will scan and connect for you.

AP roaming is another strong feature. It allows you to predefine a number of APs along with their passwords (if any) and freely roam around. The phone will drop a weak AP and pick up a strong AP without dropping a call. A practical application of this technology is in office and retail environments where multiple APs cover a wide area.

The WiFi side of the phone employs RTP/RTCP and SIP which are standard VoIP protocols. Sorry Skype users, the phone will not work with your service but will work with any of hundreds of low rate SIP service providers.

How about the GSM section? It is a cell-phone as we know it. Pretty standard although not as full featured as most today’s phones. There is no camera, no MP3 player nor similar amenities. It’s just a simple and functional mobile phone.

Tri-band feature is important to international travelers. The differences in radio bands in foreign countries require that your phone be able to access all existing bands. A tri-band phone is capable of accessing all GSM bands in use. All it requires is a local prepaid SIM chip to work at a foreign location.

UTStarcom GF210 offers exciting possibilities. Dual mode is great feature for cost conscious telephone service subscribers. However, until call service providers offer support for Fixed Mobile Convergence this unit will be more like a WiFi phone with a built in traditional mobile phone. This alone is a feature worth the price.

Size: (H) 107 x (W) 45 x (D) 20 mm

Weight: 95 grams

Take Buffalo WHR-G125 Apart

Pop it Open to See What’s Inside
Buffalo WHR-G125
Fig. 1 Buffalo WHR-G125

Opening the router may void your warranty. Unlike Linksys WRT54G the WHR-G125 has no seals to break in order to open the enclosure. I don’t understand how Buffalo would even know that the router was taken apart if that ever came up during a warranty claim.

You will need two precision scredrivers to pry the sides and one T9 size hex star screwdriver (torx) to remove a single screw.

Buffalo WHR-G125 hidden screw (disasembly)
Fig. 2 Hidden screw under the label

Turn the router upside down. You may want to place it on a pillow so to avoid scuffing the pristine white finish. As for me, I don’t give a damn if it gets scratched [Fig. 2].

There is a screw hidden underneath the label. You can either feel the indentation with your finger and punch through the label with a screwdriver or you can remove the label first. I took mine off with an exacto blade and placed it on a slick sticker backing so I could reaply it later.

Buffalo WHR-G125 pry housing apart
Fig. 3 Insert and twist to pop off

Buffalo has used a star hex shaped screw for no good reason. They obviously wanted to make it more difficult to open the enclosure. I didn’t have the right size screwdriver so I had to go get one. T9 is perfect although T7 and T8 will work too.

Buffalo WHR-G125 open enclosure
Fig. 4 Open the front

Use precision screwdrivers or other flat objects to pry off the bottom of the router. Start on one side by inserting the smaller screwdriver into the front slot and the larger into the side slot [Fig. 3].

Twist the larger screwdriver and the side tab will pop. Then turn the router around and do the same on the other side. Be careful when handling the enclosure si that it doesn’t spring back into locked position.

When both sides are released insert the larger screwdriver into the front slot and pop off the center section. It will come off easy [Fig. 4].

You may damage the plastic ever so slightly. You’ve been warned.

Buffalo WHR-G125 taken apart
Fig. 5 disassembled WHR-G125

Watch Eurovision Song Contest Online

Stream the Eurosong Webcast

Old Eurovision (EBU) logoThe Eurovision Song Contest has been one of the most watched television events in Europe for over fifty years.

Abba and Celine Dion are just a few entertainers who started their careers by competing at the Eurovision Song Contest.

The U.S. broadcasters don’t carry this pop music spectacle but if you live in the U.S. or anywhere else in the world and have access to a moderately fast internet connection you can watch the Eurosong spectacle via a live webcast.

The setup is relatively simple on Windows and Mac OS X and slighlty more complicated on Linux. This short tutorial outlines the Windows setup. Mac and Linux users should follow the provided links and instructions at the official Eurovision Song Contest site.

The Eurovision Song Contest Webcast, the Easy Way

  1. Direct your Internet Explorer or Firefox browser to http://www.eurovision.tv/page/webtv. If your computer already has the Octoshape plugin installed you should be able to see picture playback at this point.
  2. You may see the message saying that the Octoshape plugin is not installed. Click on “Play the stream” anyway and Windows Media Player will launch. If Windows Media Player does not recognize the stream you definitely do not have the Octoshape plugin installed on your computer.

To install the plugin visit http://www.octoshape.com/support/infinite-hd-octoshape-app/. Follow the installation instructions and when complete repeat the steps 1 and 2. Enjoy the show.

During the webcast in May the live stream will be available at the ESCTV site. Until then you may view prerecorded selections at the right column.

The Eurovision Song Contest Webcast, the “Hard” Way (Optional)

If you don’t feel like the “Easy Way” is challenging enough, don’t stop after you install the Octoshape plugin. Instead of staring at the computer monitor you can actually watch the Eurovision Song Contest on your TV at near broadcast quality.

If your graphics card has a composite video or S-Video out you can connect this output to most TVs. This type of graphics card will allow you to either clone the desktop to the video out so that both the external TV and the computer monitor show the same picture. Alternately, the card will let you use the dual output where your TV acts as the second screen. Either configuration is acceptable and depends on your preferences.

I prefer playing Octoshape stream in an external player like Windows Media Player because sometimes the Flash based implementations of within-the-browser stream have issues with full screen playback. If your Firefox keeps insisting on launching the stream within the browser instead of external media player you can disable the Firefox extension that handles Octoshape streams. Make sure the Octoshape plugin is running when you attempt to stream the Eurosong contest (you can also configure the Octoshape plugin to run when the computer starts).

Once the Windows Media Player starts playing the stream press ALT+ENTER to enlarge to full screen.

For Tech Inclined Readers

The Octoshape plugin is not a codec but a peer-to-peer technology that enables efficient webcast of high demand programs like live events. CNN used it for the President Obama inaguration live webcast. In addition to Eurovision many foreign language networks use the Octoshape. There are other examples of Octoshape streams.

Peer-to-peer networking works similar to Skype or file sharing. As you are downloading to your computer your machine is uploading to other users who are viewing the same content. Unlike central distribution from a single server(s) like YouTube, the Octoshape plugin depends on the grid of interconnected users to distribute the content. The topology of this network removes the bandwidth burden from the central server and minimizes service drops when there are hundreds of thousands of viewers watching the stream.

Because the Octoshape uses your Internet connection to upload the stream to other users you may want to verify if peer-to-peer setups violate terms of agreement with your Internet service provider. Allegedly the plugin does not utilize your upload bandwidth in the idle mode.

The plugin can be deployed on the client side via Flash or Windows Media Player.

The picture quality of Octoshape payload is determined by the codec (FLV, H.264, etc.) and the bitrate employed by the broadcaster. A high quality bitrate may peak around 800 kbps and will adjust lower if your connection can not handle the bandwidth. For reference, the average bitrate on a good quality DVD is around 7,000 kbps (MPEG-2).

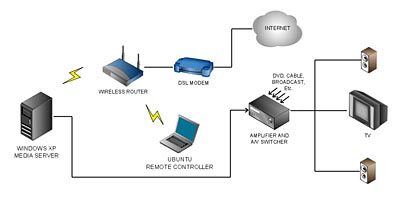
Setting Up a Media Server (Optional)

I have an old Windows XP based computer acting as a media server. This machine has an old Nvidia graphics card with a composite video output which allows me to watch the content on a regular standard definition TV. I use this setup to watch all kinds of materials, from video podcasts via iTunes, YouTube to Netflix downloads and multiple region DVDs. Of course, the Eurovision webcast is my main reason for setting up this machine.

watch Eurovision online: diagramThe Nvidia card is setup in clone mode with composite video output as the primary monitor. When the computer starts up I get to see all the bootup messages on the TV!

The computer has no other monitor attached, no keyboard, no mouse. Certain motherboards will not start without keyboard attached so you will have to override the keyboard detection in the BIOS.

Make sure the desktop pixel resolution is relatively low because high resolution text will be entirely impossible to read on a TV. Television resolution in North America is 720×486 pixels and 720×586 in Europe so don’t be afraid to go low and use large fonts.

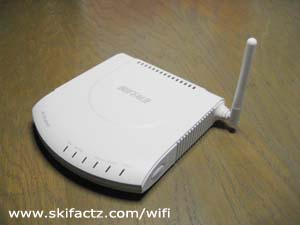
The computer has a wireless card because it is located in a place where I don’t have a network cable connection. When it boots up it launches VNC server so I can control the computer using a VNC based remote with a cheap Linux based laptop. This remote control computer can also run Windows or OS X but Ubuntu operating system is free and comes with Vinagre remote software already included.

Instead of VNC based remote, you can use Windows Remote Desktop which also works great, or you don’t even need the second computer if you put a Bluetooth card into the server and get a wireless Bluetooth keyboard with a trackball. The only problem with the latter is that reading computer desktop and browser content on a standard definition TV is very hard. I mainly use my VNC remote on a Linux laptop for text legibility.

Good luck with your setup!

Connect WiFi Phone to Authenticated Hotspot

Trick the Router

The first generation WiFi phones don’t have Internet browsers. This is more than just an inconvenience because it renders the phone useless with authenticated hotspots. However, there is a way to overcome this problem.

An authenticated hotspot is a public hotspot like those found at Starbucks, MacDonalds or most airports that requires a browser based authentication. Such hotspots are never encrypted which means that anyone can connect to them. Once connected the wireless router’s hotspot firmware requires either a user name/password combination or a credit card in order to allow Internet access. A phone without a built in browser can not go through the authentication process even if you have the user name and password.

Getting unauthorized access to the Internet is another subject altogether. What we’re interested is a legit WiFi phone connection through an authenticated hotspot.

The trick is to connect and authenticate with a laptop with a forged MAC ID first. The fake MAC ID must be the MAC ID of the wireless SIP phone. Once you do this your phone will work fine.

From the router’s perspective you connect and authenticate a device, lose a connection and reconnect again. The router has no idea that the second time you’re connecting with a different device (the phone).

An interesting thing is that in most cases you can have two devices with same MAC IDs connected at the same time. You could be talking on the phone and browsing the net on the laptop. This technique is often used by hackers to gain Internet access by capturing an unsuspecting wireless user’s MAC ID.

Windows

MAC ID is not as permanent as you may think it is. It can be changed. One simple way to do this in Windows is by using a free MAC Address Changer utility from Void Nish
With this utility you can enter your phone’s MAC ID and later restore it to your real MAC ID.

The steps:

  1. Change the MAC ID on your laptop to match the WiFi phone’s MAC ID.
  2. With the WiFi phone powered off connect to the hotspot with the laptop. Authenticate with your credentials or use a credit card to purchase a connection.
  3. Disconnect the laptop from the hotspot and power up your phone. The phone will connect to the Internet in place of the laptop.
  4. Restore your laptop’s original MAC ID.

Linux

There are several ways of doing this in Linux as well. I tested this method with Nokia N770 but it could possibly work with Mac’s with some modifications. Your N770 will need some add-ons like X-Terminal and Root Access.

The steps:

  1. Start X-Terminal.
  2. Type “sudo gainroot” to gain root level access (“sudo su”on Ubuntu).
  3. Type “ifconfig wlan0 hw ether nn:nn:nn:nn:nn” (where nn:nn:nn:nn:nn is your phone’s MAC ID.
  4. With the WiFi phone powered off connect to the hotspot with the N770. Authenticate with your credentials or use a credit card to purchase a connection.
  5. Disconnect the N770 from the hotspot and power up your phone. The phone will connect to the Internet in place of N770.
  6. Restore your N770’s original MAC ID (it helps if you wrote down the original ID).

With some basic Linux skills you can write a bash script to “fake” and “unfake” the MAC ID. With a script the whole process takes just a second to complete.

Spray Paint Your Linksys WRT54G Router

Pimp Out Your Showpiece


WRT54G custom painted white
Fig. 1 WRT54G painted white

Why would you want to spray paint your router? My wife was asking the same question. I’m not exactly sure.

A part of it is the joy of customizing your gear. You can pimp it out metallic gold or if you are into eighties crap you can spray it with rock texture paint.

Another compelling reason to paint the router is to blend it in the surrounding which is the main reason I painted mine semi-gloss white [Fig. 1].

It’s very easy to do. All you need is a can of paint, an old newspaper to protect from overspray and patience.

You could use a brute force approach and slap the paint over the assembled router. This is easy enough to do but the results do not look very professional. On top of that covering the face decal with paint is not the best idea. What we really need to do is take the WRT54G apart.

First we have to learn how to open the WRT54G housing. [LINK]

When done remove the face decal by inserting an exacto blade or another pointy object under one of the corners. Carefully peel the decal off and place it in a safe place with the sticky side up. You can also place the sticky side down onto a slick bumper sticker backing.

To remove the rubber feet insert a screwdriver into the hole and pop the feet off.

Prepare for Paint
If you are interested in preserving the decals on the bottom of the router tape them off with masking tape. Otherwise you can spray over them.

Protect your working area with enough newspaper or a dropcloth to catch overspray. Do the spraying outside. Wear a respirator if you have one. Lay the pieces onto the newspaper.

Painting

There isn’t much to it. If this is your first time spray painting test the technique on another surface before you start on the router. The key is to use even smooth movements that cover all areas uniformly. Hold the can far enough from the surface to avoid getting splotchy coverage.

You will need a number of coats to cover the plastic. Wait time between coats will vary depending on the temperature and humidity. Read the instructions on the can. I may have done as many as 6 coats to cover the black plastic.

If you use special effects paint like rock texture consider doing a clear polyurethane top coat that will protect your paint job.

Reassembling the Pieces

Give yourself at least a day before you put everything back together. Although the paint may seem dry to touch the plastic snaps that hold the router pieces may stick together if you close the housing too soon. This could make opening the router difficult in the future.

UTStarcom F1000G External Antenna

Boost Your WiFi Range with a High Gain Antenna 

UTStarcom F1000G SIP phone works pretty well with the built in antenna. Adding an external antenna will allow you to connect to a wider range of distant access points with your WiFi SIP VoIP phone.

UTStarcom WiFi phone with external antenna mod
Fig. 1 Testing

I connected a biquad antenna [Fig.1] to this WiFi phone and noticed that it picks up more access points. I have not done any measurements of the signal gain yet. You’ll have to wait for that report or let me know what you find out if you decide to do it yourself.

First we need to open the phone by following these instructions. [LINK]

hirose connector aboard UTStarcom F1000
Fig. 2 Mounted external antenna connector

The phone has a miniature external antenna connector already mounted on the PCB [Fig.2]. If you have a matching connector use it. If not you can solder into the PCB.

I initially wanted to replace the headset jack with external antenna connector but decided against it due to space constraints. Instead drill a hole on the backside of the phone. Start with a small drill bit and go bigger or use a conical drill bit if you have one.

UTStarcom F1000 drill a hole
Fig. 3 Hole location

Don’t over drill so your connector can fit is snuggly [Fig. 3]. I used a SMA connector. It protrudes out of the phone which is not very elegant [Fig. 4] but it’s the only way because a coupling SMA connector on a pigtal has to screw on over the barrel.

UTStarcom F1000 mount SMA connector
Fig. 4 SMA connector

I suppose that it’s better to use a coaxial cable between the connector and the PCB but since the run is so short I just used regular straight cable. Your soldering iron tip has to be very pointy. The connections are really small. Use a magnifying glass to verify that solder didn’t jump connections.

UTStarcom F1000 solder into the PCB to add eternal antenna
Fig. 6 Solder points
UTStarcom F1000 antenna mod
Fig. 7 Ready
UTStarcom F1000 with pigtail cable attached
Fig. 8 Pigtail attached
Extreme closeup of SMA connector on WiFi phone
Fig. 9 SMA connector close up

When done assemble the phone as described in these instructions. [LINK]

UTStarcom F1000G Disassembly

Open your WiFi SIP Phone for Repairs and Hacks

This one is not for the faint of heart. You will have to tug and pull your F1000G to pop it open. Why did I do it in the first place? My friend dropped a phone and the battery connector fell out of the PCB. The telephone was basically dead so I disassembled it to fix it. In the process I made an interesting discovery. Another Utstarcom F1000G WiFi phone hack is coming your way soon.

Utstarcom F1000G location of housing snaps
Fig. 1 Locations of 4 snaps

Step 1

Remove the battery cover and disconnect the battery. There are 4 screws holding the face and the back of the phone together. Take the screws out using a micro phillips screwdriver. The fourth screw may be hiding under a white round sticker near the battery connector. If your aim is to preserve UTStarcom warranty intact you may want to carefully remove the white sticker with a pointy object and save it so you can put it back in place later.

Utstarcom F1000G disasembly
Fig. 2 Hold tight and pull

Step 2

You will notice that you can pull apart the faceplate and the back of the phone at the bottom. There are four little snaps locking the back into the faceplate. Two snaps are on the sides and two are at the very top [Fig. 1]. They are really tight but we’ll pop them off with some force. Caution, the body of the phone may break. I’ve done this only once but I did not damage the plastic.

Utstarcom F1000G top snaps holding the housing
Fig. 3 The top snaps still in place

Hold the phone with both hands as illustrated in Figure 2 and pull. Pull hard but be ready to stop as soon as the snap pops out or else you may break the body. When the snap is out turn the phone around and pull out the matching snap on the other side.

Utstarcom F1000G vibrator
Fig. 4 The vibrator mechanism

Step 3

With two lower snaps out of place the faceplate and the back of the phone are held together by the remaining snaps at the top. The phone is now like a clamshell [Fig 3]. Pull the phone parts away from each other again but this time give them a little twist. It will feel like the phone body will break (and it may) but you may get lucky as me and get the darn thing to snap out. Only one snap will pop out at the time.

Utstarcom F1000G exploded layers
Fig. 5 F1000G in pieces
Utstarcom F1000G  keypad and LCD display
Fig. 6 F1000G keypad and LCD display
Utstarcom F1000G hirose connector
Fig. 7 F1000G external antenna connector

A Discovery

If you look closely at the lines leading to the antenna you will notice there is a little connector soldiered into the board [Fig. 7]. It’s very small. I think it may be a Hirose U.FL-R-SMT connector ready to accept an external WiFi antenna! As you may have noticed from the other projects listed on this page I’m a WiFi antenna kind of a guy. I’ll be hooking up some crazy microwave antenna to one of my wireless SIP phones soon. Small phone, big antenna, a recipe for enhanced WiFi telephony.