Newer versions of Ubuntu use Gnome desktop. Although Gnome is really well designed adding items like URL links to the launcher bar is not straightforward.
You can not just drag and drop a link onto the launcher bar. However, you can turn a URL link into an executable icon that can be pinned to the launcher.
Open Gedit or another text editor and compose a .desktop application launcher file. Note that this file will start Chrome, but can be modified to launch any other browser.
Let’s go over some of the elements in this .desktop file. The Exec directive is used to launch Chrome and open this website. Obviously you’d substitute any other link of your choice as well as the string in the Name directive.
The keywords are useful if want to press the Super key and search for the launcher by typing in a keyword.
The icon file can be a small PNG file saved anywhere. You can use the existing icons directory as in the example above.
Substitute your user name. You may need to press CTRL + H in the save dialog box to be able to see the hidden .local directory.
Once the file is saved you should be able to find it in your applications menu (Super + A). If it fails to launch it may need an executable privilege. To make the file executable, right click it, select Properties and add executable permission for yourself and any additional users.
Now, that we have an executable icon we can right click it in the applications menu and add it to favorites. This will pin the link to the launcher bar.
You can spend upwards of $200 on a home Network Attached storage (NAS) or you can build one using spare parts like I did. Not only the DIY solution is cheaper, but it also allows you to customize the NAS to meet your needs.
It’s also a great way to learn how all this stuff works. This tutorial covers the hardware assembly and installation of all necessary software.
You should be familiar with Linux, but beginners can follow the steps with an occasional Google cross reference.
Unless you’re logged in as the root user you will need to prepend many of the commands with sudo, i.e. “sudo nano /etc/network/interfaces ” to temporarily grant yourself superuser privileges.
Orange Pi One does not support USB 3. Read Disk I/O below for data transfer rates.
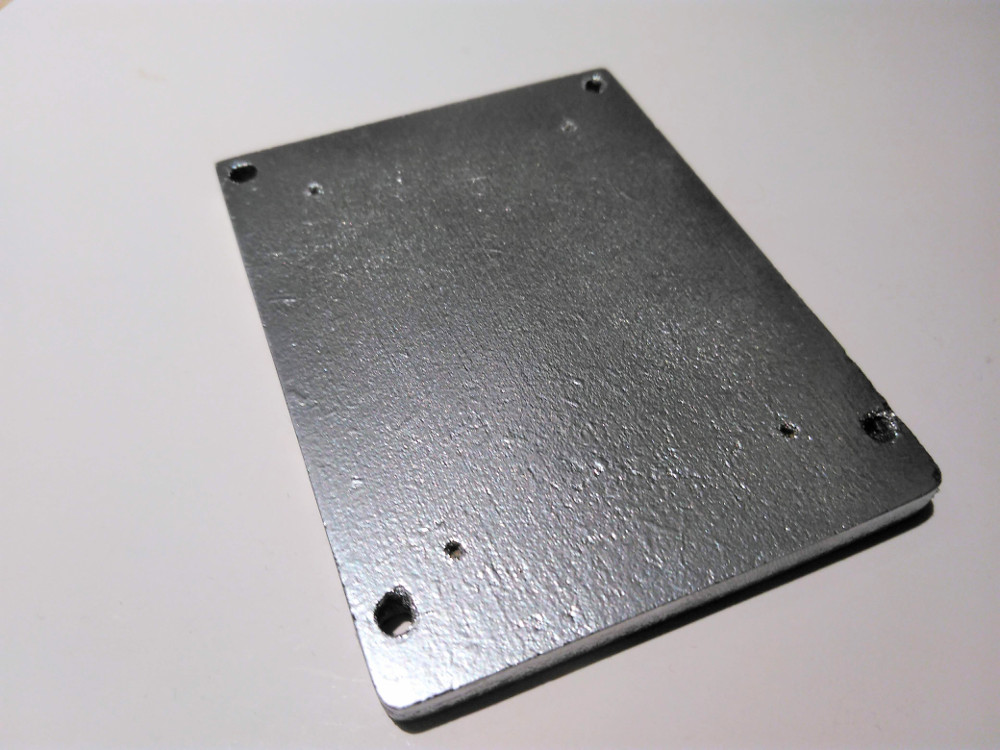
Mounting plate for Orange Pi and SSD
I gave up on using a premade Orange Pi One enclosure because they can not accommodate a 2.5″ SSD. Instead I cut a piece of pressboard to the SSD size, spray painted it chrome and mounted it on top of the SSD using #4 bolts.
The SSD mounting holes are spaced a bit wider than the holes on the Orange Pi One board. That’s why we need a mounting plate to mount Orange Pi One.
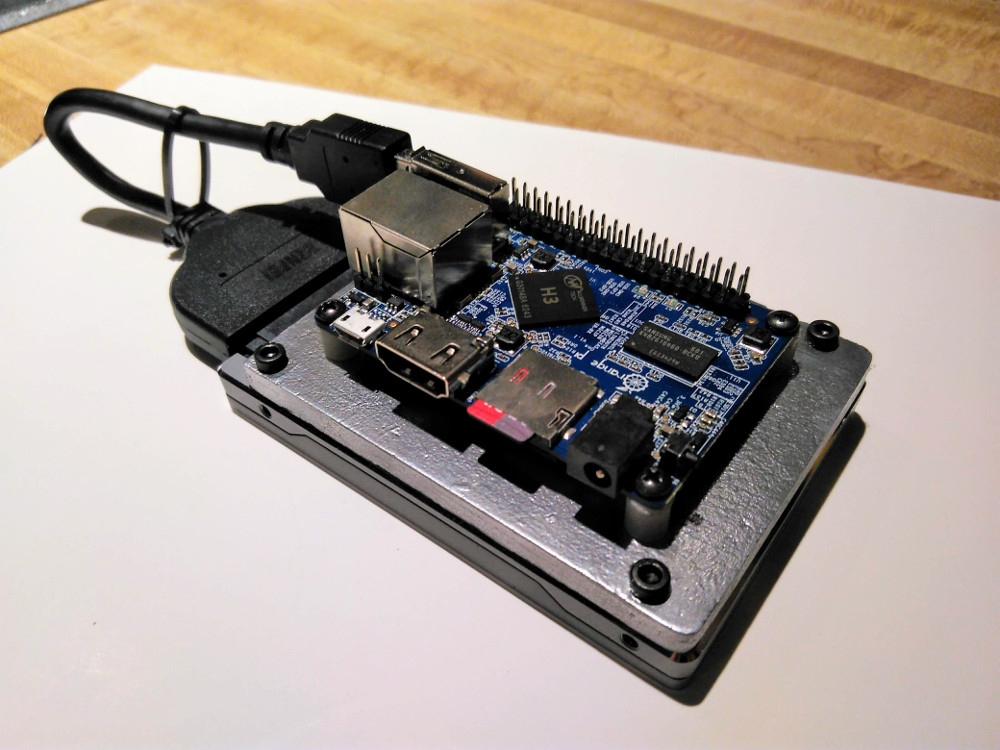
I used short PVC spacers to lift off the Orange Pi and screwed it into the pressboard.
The USB to SATA cable loop was tugging on the USB connector. I pulled it tighter with a zip tie to relieve the stress on the connector. I will look for a better cable.
Orange Pi + SSD = NAS
The Operating System
The OS is installed on a Micro SD card. I use Debian. I’ve had this computer for a while and don’t remember if I downloaded the OS image from the Orange Pi site or from the official Debian site.
However, I upgraded to Debian 9 Stretch using just the official Debian repo. Make sure to use the armhf architecture.
Connecting to the Orange Pi
You can connect the Orange Pi One HDMI output to a display and add a USB hub to connect a mouse and a keyboard. Instead I just ssh into the machine from another Linux box like:
ssh <myUserName>@<OrangeOneIP>
You can create a private/public RSA key pair on the client machine and push the public key to the Orange Pi to avoid being prompted for the password.
You can also connect from outside of your network if you setup port 22 forwarding in your router/firewall to send traffic to the IP address of the Orange Pi. If you do so, make sure your passwords are very strong.
You may experience thousands of brute force password crack attempts an hour. A good tool to reduce risk is Fail2ban which temporarily bans originating IPs after five failed login attempts. You can install Fail2ban with:
apt-get install fail2ban
Static IP
It’s very useful for a NAS to have a static IP address. Debian 9 is usually configured to use DHCP at install time.
To setup static IP address use a text editor like vi or nano:
nano /etc/network/interfaces
And add something like:
Static IP setup
auto eth0
allow-hotplug eth0
iface eth0 inet static
address 192.168.1.100 #This is the static IP address for Orange Pi
netmask 255.255.255.0
gateway 192.168.1.1 #This is your router IP address
The actual IP addresses may be different in your case. Make sure to select an unused IP address for the Orange PI.
The new configuration will not take effect until you reboot or restart networking with:
systemctl restart networking
The Overclocking Issue
The original Orange Pi One shipped with some overclocking issue. Run the dmesg command to see if the log is flooded with something like this:
[ 16.876698] [ARISC WARING] :callback not install

[ 16.886241] [cpu_freq] ERR:set cpu frequency to 480MHz failed!
To mitigate the problem install:
apt-get install cpufrequtils
And edit the configuration:
nano /etc/init.d/cpufrequtils
to change:
governor="powersave"
This is not the most elegant solution. It will make your CPU run slower, but it will also runs cooler and the errors will go away.
Mounting the USB Drive
Your USB connected SATA drive will not automatically mount when connected. To mount manually you first need to find out the device name.
Connect the drive and execute dmesg. The device name will be printed towards the bottom of the log. Let’s say the drive device name is sda1 in our example.
Create a directory that will become the mountpoint and mount the drive:
mkdir ~/storage

mount /dev/sda1/ ~/storage
If you mount the drive with sudo then you need to change the ownership so your regular user can read and write:
Your system is now up and running and you can setup servers and services that will make it into a NAS.
Setup Samba
A NAS requires a Samba server so that Windows, MacOS, and Linux machines can connect to the network share. To install SMB use:
apt-get install samba
Open the Samba configuration file:
nano /etc/samba/smb.conf
Copy, paste, customize, save:
smb.conf
[<yourShareArbitraryName>]
comment = All Users
path = /home/<yourUserName>/storage
valid users = @users
force group = users
create mask = 0774
directory mask = 0771
writable = yes
The “storage” directory is the mountpoint we had created earlier.
Add a Samba user:
smbpasswd -a <newUserName>
Restart the Samba server:
systemctl restart smbd
At this point the machines on your network should see the share and connect as newUserName you created.
Connecting to the share is specific to your client OS. In Windows you can right click “Computer” and select “Map Network Drive.” In the folder field type:
\\<OrangePI-IP-Address>\<yourShareName>
Atomated Backup
The beauty of building your own NAS is that you can add any type of service you need. I added a daily automated backup to an off-site server I own. You can also use Google Drive, Amazon S3 Bucket, or any other cloud storage
I have a ~/backup.sh script containing something like:
It uses the rsync command to do incremental backup of ~/storage to a remote server called someServer.com. The –delete option ensures that any files deleted on the NAS are also removed from the backup server.
We use systemd again to make a service out of this script and schedule it. You can also use cron to schedule.
Create a backup service:
nano /etc/systemd/system/backup.service
Copy, paste, customize, save:
backup.service
[Unit]
Description=Rsync backup of NAS storage to a remote server
Orange Pi One has USB 2 on-board. The average write rates I clocked are:
33 MB/s for EXT4 formatted drive
17 MB/s for NTFS formatted drive
This same drive is able to hit 93 MB/s using USB 3 on another machine.
If you format your drive as EXT4 you will not be able to read it on MacOS/Windows without some extra EXT file system software. I’m primarily Linux based and EXT4 works just fine for me.
To test the speed, make a tmp folder on the drive and run dd:
After years of using small underpowered phones I was shopping for a sturdy phone with a decent battery life. There are several smartphones on the market that can take a serious beating. But Cat S60 is the only phone that has a built-in FLIR thermal imaging camera.
Why I’d need an infrared camera in a phone? Well, my wife asked the same question, but I’ll get into that a bit later. Let’s first look at the basics.
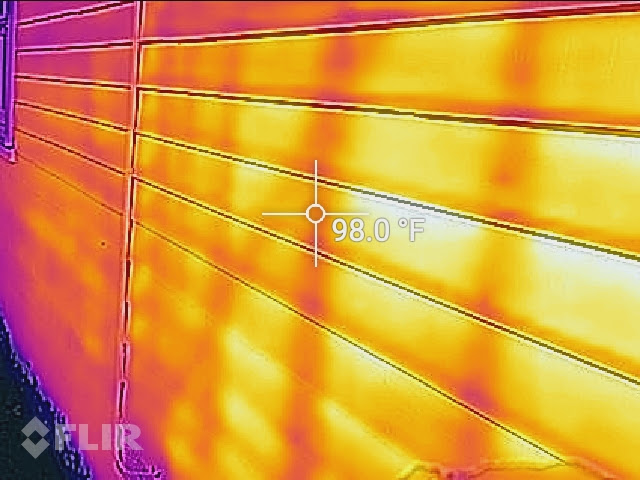
Figure 1 – looking through a wall with Cat S60 phone’s FLIR camera
The Phone
The first question people ask is “Is that phone really made by Caterpillar?” The answer is no. It’s made by a company called Bullit and marketed under the Cat brand. However, it’s built tough like a Caterpillar construction machine.
I’m no smartphone expert. My last phone was a sub-miniature Posh S240 which has an awesome form factor, but suffers from real low end performance. It’s easy to see a huge difference in speed when upgrading from a Posh to a “normal” size phone. Without running any benchmark test, my subjective impression is that Cat S60 is pretty decent and a bit snappier than iPhone 5s.
The battery life is very good. I can go for about two days on a full charge, not much talking, some texting, some Facebook and Internet radio use and about 80 minutes of daily Waze or Google Maps. If I skip using Waze the phone consumes less than 30% of the battery in twelve hours.
The voice quality is clear. The speaker is fairly loud, but I’d like it to be even louder for a phone intended to be used in tough environments.
I run the screen brightness at 50% for normal use and go 100% for bright outdoors use. The display is readable even in strong direct sunlight in the snow. It automatically attenuates the backlight level based on the level of environment illumination which is a great feature if you’re constantly going indoors and outdoors at work.
Cat S60 comes with Android 6.0.1 without a ton of bloatware. There are a couple of Cat related apps I opened once and never tried again. However, the custom speaker drying app may come in handy when the phone gets wet.
Speaking of drying, the phone is waterproof down to 5m depth and can even take underwater pictures. I routinely rinse it out under a running faucet and listen to the music in the shower on occasion. The touchscreen operation is not compromised when wet. I was most skeptical by the claim that the screen is responsive to gloved hand operation. I’m happy to find out that in fact I can use ski gloves with Cat S60. It’s not quite as easy to do as when using bare fingers, but it works well enough to be able to answer a call and read emails. The touchscreen seems to respond to gloves better when wet. I had no problem using the phone in a wet snowstorm the other day, but it was less responsive the next day when the storm was over.
The build quality is extremely solid although the phone is heavy. Because of the weight it slipped out of my pocket and hit the concrete floor by the corner of the steel frame when it was brand new. It bounced off and hit another corner. There was not a scratch on the screen and just a couple of nicks on the bumper which I ground down and polished with high grit sandpaper.
The plastic backside does not feel as strong though. The dual SIM and memory card slots are located inside an easily accessible compartment on the back. I hope the compartment door is well sealed to keep water out when submerged.
The phone is equipped with an FM radio, a fairly standard feature in Android phones. It has a covered SOS button and a user programmable button.
Pressing the inset SOS button triggers a third party app to dispatch prebuilt SMS messages with GPS coordinates to a list of recipients. Of course, the phone has to be within coverage area for this feature to work. I think the button is not exclusively bound to the SMS emergency app.
The orange programmable button can be assigned to any app (I think). I am using it as a PTT button for Zello. This app is sort of like good-old Nextel Direct Connect, but it has its share of issues. The cool thing is that I can just hold the button for a couple of seconds until Zello is launched and then start talking to the Zello user I last spoke to.
The Thermal Camera From FLIR
The regular camera quality is so-so. I tested it with the stock camera, as well as Open Camera and Better Camera apps. In all three the auto-focus seems to struggle identifying the focus target. This is particularly evident in video clips where the auto-focus inexplicably racks back and forth while recording video.
This issue is hard to justify on a 600 USD phone. I had a correspondence with the Cat support regarding this problem. They suggested upgrading the firmware. Although my unit does not have the latest build, it refused to download and flash the latest firmware. The support then suggested I do a full factory reset. I didn’t want to blow off all my customizations only to find out the camera problem is a hardware issue. I’d rather have them exchange the phone, which to Cat support discredit, they did not offer. Make sure to test the phone hands on when buying if the camera feature is important to you.
This brings me to the other camera in the phone—the FLIR thermal camera.
FLIR cameras used to run for tens of thousands of dollars, and the high end models still do. What does a thermal camera do? It allows you to see infrared light which is the part of the spectrum invisible to our eyes.
Each time you take a picture with the FLIR app the camera takes a thermal image and a visible light image. The two cameras are mounted side by side with maybe 16mm of interocular distance. The small amount of parallax between the visible and the IR camera allows the app to draw a basic contour using the visible image and fill it in with the pseudo color from the thermal camera.
After the image is taken, you can wipe the visible light photo on and off to correlate the heat distribution to the objects in the scene.
Can you see through clothes and walls with Cat S60? No, but…
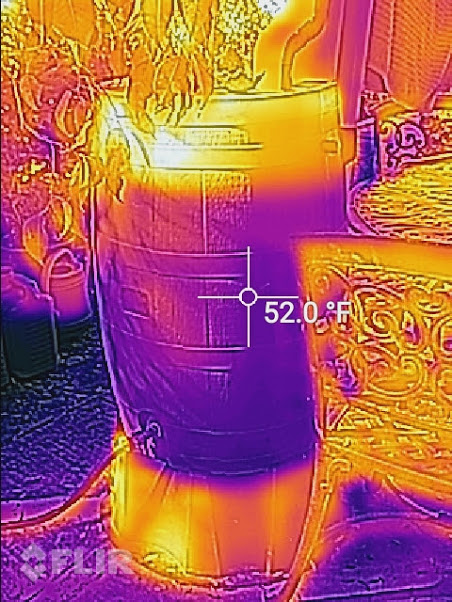
Figure 2 – determining fluid level with FLIR
Remember, this is not an X-ray vision. But the heat dissipation of the pictured objects can uncover the shape of things that are impenetrable by visible light. For example, you can see the shape of a person’s body through baggy, lose fitting clothes. I’m pretty certain, you could to also see hidden objects strapped to the body.
You can’t see through the walls, but you can see how an external house wall is radiating heat which in turn can uncover the structural framework. In figure 1 above you can see the framing underneath the siding of a house. The frame is showing darker in the image because it’s blocking heat from escaping the house.
The water level inside a rain collection barrel in figure 2 is visible because there is a difference in temperature between the water and the warmer air inside the barrel. Note that this picture was taken in the morning. The effect would be exactly opposite in the evening—the water in the barrel would remain warmer longer than the cold evening air.
Figure 3 – disc brakes heat image
The FLIR camera app represents the temperature values using user selectable color schemes, out of which the “lava” and pure black-and-white as seen in the shot of a car wheel with hot breaks in figure 3 appear to be the most usable. The camera dynamically scales the representation value range based on the maximum and the minimum temperature in the scene. This means that the coolest temperature always shows as black and the highest temperature always shows as white. This is handy because it expands the dynamic range of the FLIR camera and allows for better precision.
The actual temperature reading is represented in Fahrenheit or Celsius units next to the center screen crosshairs. Strangely, Kelvin readout is not available. User can set additional crosshairs and averaged area temperature readouts.
The camera also shoots video clips although I haven’t played much with this feature.
FLIR Tools is a free companion app available from Play Store. It allows for additional temperature measurements and it can prepare information rich PDF reports with IR and visible light photos side by side.
Back to my wife’s question, why would I need an infrared camera? There are literally hundreds of applications for thermal photography.
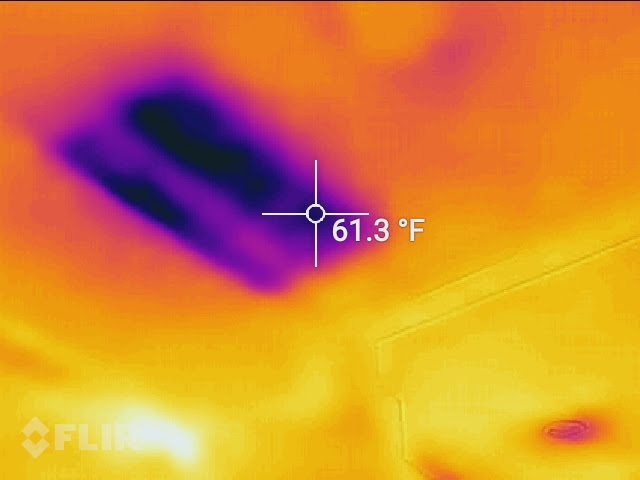
Figure 4 – an invisible hole in the ceiling made visible with Cat S60
Building construction and real estate appraisal are fields where infrared photography is invaluable. The figure 4 shows the ceiling in my kitchen. The previous owners mush have had a roof leak. It was repaired well and the seams are invisible to the naked eye. But the Cat S60 FLIR camera can clearly see the rectangular shape of a less dense piece of drywall and perhaps lack of ceiling insulation.
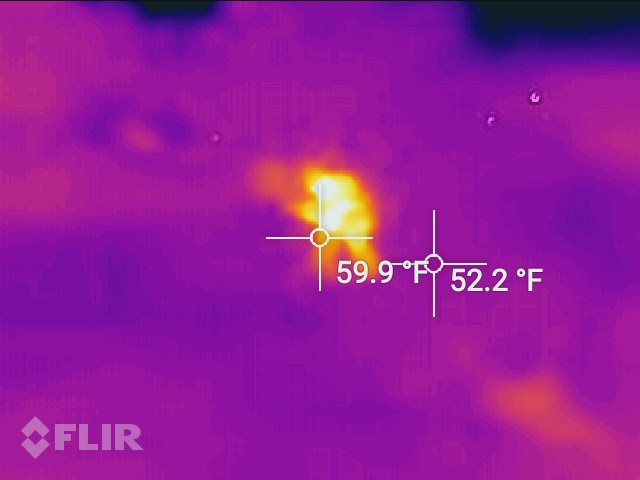
Figure 3 – night vision security
Perimeter security is another potential application for night vision. The figure 5 shows a person hiding behind a bush. The intruder is invisible to the naked eye as well as the regular camera, but completely exposed in the IR photo.
Automotive repair, food service, health services and many other endeavors can all benefit from inexpensive thermal imaging. I personally can’t wait to see if I can pick out cops in radar gun stakeouts miles down a highway at night.
I only wish they Caterpillar could resolve the auto-focus issue. It’s unfathomable that a higher end phone like Cat S60 would suffer from such a basic camera issue like poor auto-focus.
I got my hands on a used Raspberry Pi and I ordered an Orange Pi at Aliexpress (which was an ordeal). With both devices up and running I decided to run a simple benchmark to see which tiny computer is faster.
Basic Specs
Orange Pi One
Quad-core ARM Cortex-A7, 1.2GHz
512MB RAM
Debian GNU/Linux 8
Raspberry Pi, Model B Rev 2.0
Quad-core ARM Cortex-A7, 900GHz
512MB RAM
Raspbian GNU/Linux 8
Both machines are running headless OS. I suspect not having to draw the GUI may speed things up a bit. Typical installations with a desktop maybe a little slower.
Orange Pi One is roughly twice as fast as Raspberry Pi Model B. These are the outputs of sysbench:
sysbench --test=cpu --cpu-max-prime=20000 run
Orange Pi One
sysbench 0.4.12: multi-threaded system evaluation benchmark
Running the test with following options:
Number of threads: 1
Doing CPU performance benchmark
Threads started!
Done.
Maximum prime number checked in CPU test: 20000
Test execution summary:
total time: 611.3697s
total number of events: 10000
total time taken by event execution: 611.3603
per-request statistics:
min: 61.10ms
avg: 61.14ms
max: 68.35ms
approx. 95 percentile: 61.15ms
Threads fairness:
events (avg/stddev): 10000.0000/0.00
execution time (avg/stddev): 611.3603/0.00
Raspberry Pi Model B Rev 2.0
sysbench 0.4.12: multi-threaded system evaluation benchmark
Running the test with following options:
Number of threads: 1
Doing CPU performance benchmark
Threads started!
Done.
Maximum prime number checked in CPU test: 20000
Test execution summary:
total time: 1353.0583s
total number of events: 10000
total time taken by event execution: 1352.9982
per-request statistics:
min: 132.12ms
avg: 135.30ms
max: 293.84ms
approx. 95 percentile: 145.17ms
Threads fairness:
events (avg/stddev): 10000.0000/0.00
execution time (avg/stddev): 1352.9982/0.00
The old Scanmeter high gain WiFi antenna pointer written in Bash still works very well.
However, it depends on the output of iwlist command to read wireless APs. For some reason iwlist is not reliable on my new Ubuntu machine.
I wrote a new antenna pointing tool in Python called Scanmeternm. Instead of iwlist, I am reading the wireless router power using ncmli dev wifi command. It’s certainly easier to customize for casual coders than the old Bash Scanmeter. For example, you could probably use the script to control an Arduino stepper motor and automatically rotate antenna on top of a vehicle.
Usage
The usage is very straightforward, and it is more user friendly than the old Scanmeter.
If you download to your Downloads directory, you’d add executable privilege:
chmod +x ~/Downloads/scanmeternm.py
Run as:
./~/Downloads/scanmeternm.py
Caveats
Requires Network-manager package
Does not work in Windows, maybe not even in OS X. I don’t know if Network-manager is available for Mac.
I don’t know what units are used for nmcli dev wifi output. They may be linear or logarithmic. The meter readout green/red threshold is entirely arbitrary.
Scanmeternm.py Wifi Antenna Pointer
#! /usr/bin/env python
# Measure wifi signal based on nmcli. Works only if Network-manager is installed.
# Scanmeternm V1.0, skifactz.com/wifi
from subprocess import Popen, PIPE, STDOUT
import sys
import os
import time
# User customizable variables
# Customize meter readout here
threshold = 52 # Red/green threshold
char = u'\u2588' # Graphics character, default is a box
# Menu scanned list variables
ssidMaxLength = 17 # Truncate length to satisfy tab based layout fit within 80 columns.
tab = '\t' # Tab character. Can use ' ' or '\t' * 2 to modify layout
# Lookup tables for 2.4 GHz and 5 GHz frequency to channel conversion.
lut24 = {
2412:'01 (2.4 GHz)',
2417:'02 (2.4 GHz)',
2422:'03 (2.4 GHz)',
2427:'04 (2.4 GHz)',
2432:'05 (2.4 GHz)',
2437:'06 (2.4 GHz)',
2442:'07 (2.4 GHz)',
2447:'08 (2.4 GHz)',
2452:'09 (2.4 GHz)',
2457:'10 (2.4 GHz)',
2462:'11 (2.4 GHz)',
2467:'12 (2.4 GHz)',
2472:'13 (2.4 GHz)',
2484:'14 (2.4 GHz)'
};
lut5 = {
5035:'07 (5 GHz)',
5040:'08 (5 GHz)',
5045:'09 (5 GHz)',
5055:'11 (5 GHz)',
5060:'12 (5 GHz)',
5080:'16 (5 GHz)',
5170:'34 (5 GHz)',
5180:'36 (5 GHz)',
5190:'38 (5 GHz)',
5200:'40 (5 GHz)',
5210:'42 (5 GHz)',
5220:'44 (5 GHz)',
5230:'46 (5 GHz)',
5240:'48 (5 GHz)',
5260:'52 (5 GHz)',
5280:'56 (5 GHz)',
5300:'60 (5 GHz)',
5320:'64 (5 GHz)',
5500:'100 (5 GHz)',
5520:'104 (5 GHz)',
5540:'108 (5 GHz)',
5560:'112 (5 GHz)',
5580:'116 (5 GHz)',
5600:'120 (5 GHz)',
5620:'124 (5 GHz)',
5640:'128 (5 GHz)',
5660:'132 (5 GHz)',
5680:'136 (5 GHz)',
5700:'140 (5 GHz)',
5720:'144 (5 GHz)',
5745:'149 (5 GHz)',
5765:'153 (5 GHz)',
5785:'157 (5 GHz)',
5805:'161 (5 GHz)',
5825:'165 (5 GHz)'
};
# Convert 2.4 GHz and 5 GHz to channel numbers.
def getchannel(freq):
if freq[0] == '2':
return lut24[int(freq)]
if freq[0] == '5':
return lut5[int(freq)]
return 'N/A'
# Prints list of scanned APs for main menu and returns the list
def aplist():
# Clear Linux console
Popen(['clear'])
# Scan available APs and save in scannedMenu list.
My neighbor suspected he had daily Internet connectivity outages always taking place at the same time. I wrote this very simple Python script that pings Google.com at regular intervals and logs the ping time and success/failure. He was able to take this log to his ISP and escalate his tech support case with good evidence of technical problems.
You can modify the script to ping your router instead of google.com i.e. 192.168.1.1 if you suspect local network problems.
Usage
From command line run ./pinger.py [seconds] like: ./pinger.py 120 to ping every two minutes. In Windows, with Python 2.x installed, you can also double click the icon and the script will ping once a minute.
The script will save a .csv log in the same directory. You probably don’t want to ping at very short intervals for prolonged periods of time or it may be construed as a DoS attack by Google.
Force quit the script after you have collected enough information. Otherwise it will loop forever.
pinger.py
#! /usr/bin/env python
# Generates ISP connectivity log until stopped by user.
# Version 0.2. www.skifatctz.com/wifi
from datetime import datetime
import time
import os
import sys
hostname = "google.com"
logfile = open('pinglog.csv', 'w')
logfile.write('Test of: ' + os.uname()[1])
logfile.close()
if len(sys.argv) == 1:
interval = 60
else:
if sys.argv[1].isdigit() == False:
sys.exit('Usage: pinger.py [x] where x is an the number of seconds for ping interval.')
Wouldn’t it be interesting to find out if you personally know any of Ashley Madison members? With some elementary knowledge of Python you can!
The amount of information produced in the Ashley Madison security breach is staggering, but not outside of reach of a patient data forensics hobbyist.
In this tutorial we will avoid setting up a robust MySQL server that would be necessary to sift through the mountains of data. Instead we’ll use Python and a text editor.
Consider that there are many fake accounts in the Ashley Madison database, including President Obama and Donald Trump accounts. Just because someone’s email address was used in creation of an account it doesn’t mean the person in question has had anything to do with it. Even if an account is real, it does not mean the member has done anything immoral or illegal.
What We Need
Python 2.7 (preinstalled on OS X and many Linux distros)
text editor
aaminno_member_email.dump file
contacts.csv from your Gmail account, saved in Outlook format
The Process
We will cleanup the dump file into a smaller, human readable file. Then we will compare your Gmail contacts email addresses to the email addresses in the cleaned Ashley Madison email file.
Step 1. Tidy Up the File
Copy and paste this Python script into a text editor and save as amcleaner.py. Unless you are running Windows give the file executable permissions. Make sure to save the file in the same location as the aaminno_member_email.dump file.
amcleaner.py
#! /usr/bin/env python
# amcleaner.py
# Cleans up Ashley Madison email dump to a readable list.
Amcleaner will load the Ashley Madison email dump file, strip off excess information and save a file called emailcleaned.txt. The script looks for a particular pattern in the MySQL dump file, splits, and deletes the contents based on this pattern.
Double click amcleaner.py or run from command line to see progress feedback. The process may take quite a bit of time to complete. If you double clicked the script there will be no particular notification of completion. Monitor the changing size of emailcleaned.txt to determine when the process is finished.
Emailcleaned.txt is still going to be a large file that may overwhelm the text editor, but you could try opening it.
Step 2. Compare to Gmail Addresses
Copy and paste this Python script into a text editor and save as amcompare.py. Unless you are running Windows give the file executable permissions. Make sure to save amcompare.py in the same directory as emailcleaned.txt file created in the previous step.
amcompare.py
#! /usr/bin/env python
import time
import csv
# amcompare.py
# Compares your Gmail/Outlook contacts against Ashley Madison email list.
# www.skifactz.com/wifi
def etc(state, passes):
'''Estimated time of completion in minutes.'''
global tStartTime
if state == 'start':
tStartTime = time.time()
if state == 'check':
etc = (time.time() - tStartTime) * passes
return int(etc / 60)
# Open Gmail contacts file
gmailcontacts = open('contacts.csv', 'rb')
reader = csv.reader(gmailcontacts)
# Place email addresses into mycontacts list
mycontacts = []
for row in reader:
if row[14] != '':
mycontacts.append(row[14].lower())
if row[15] != '':
mycontacts.append(row[15].lower())
if row[16] != '':
mycontacts.append(row[16].lower())
gmailcontacts.close()
print 'Gmail file is loaded.'
# Load clean AM emails file and place into a tuple
amaddress = open('emailcleaned.txt', 'r')
amemails = tuple(amaddress)
amaddress.close()
print 'AM email file is loaded.'
# Create output file
matched = open('matched.txt', 'w')
# Initiate estimated time of completion
passes = len(mycontacts)
etc('start', None)
# Iterate through AM emails looking for matches, write to file if found
for i in mycontacts:
print 'Scanning: %s' %i
for email in amemails:
if i == email[:-1]:
print 'Found match: %s' %i
matched.write(i + '\n')
t = etc('check', passes)
passes -= 1
print '%s minutes to completion' %t
matched.close()
print 'Finished. Read matched.txt for matches.'
Save contacts.csv in Outlook format from your Gmail contacts. Make sure to save the file to the same directory as amcompare.py.
Run amcompare.py by double clicking the script. The script will extract all your Gmail email addresses and compare them to the Ashley Madison members’ email addresses. Any positive matches will be saved in a file called matched.txt. This process may take a while too so let it cook for a while, or start it from the command line for progress feedback.
Most image file types can contain extensive metadata. This information can describe parameters like geolocation of the photograph, description, keywords, etc.
The Exif metadata embedded by a digital camera at the time of the capture can be altered and expanded using any number of free or non-free Exif and XMP editors.
Exiftool is a free OS independent command line based editor specifically suited for high volume and automated batch metadata editing. Exiftool is highly scriptable using Bash, Batch, Python or whatever the tool of your choice may be.
I wrote a Linux Bash script for a project where thousands of scanned photographs needed to be augmented with new metadata. Some information was image specific and required user entry like geolocation, description, searchable keywords and the year picture was taken. Other information was hard coded into the script because it was specific to the set like the name of the locale and the country of origin ISO code.
The script is essentially a one-liner command:
exifmod bash script
#!/bin/bash
echo "Modifying image "$1
echo "Enter latitude"
read latitude
echo "Enter longitude"
read longitude
echo "Enter elevation"
read elevation
echo "Enter description"
read description
echo "Enter comma separated keywords"
read keywords
echo "Enter year"
read year
exiftool \
-Description="$description" \
-Subject="$keywords" \
-PersonInImage="$description" \
-ImageDescription="$description" \
-Caption-Abstract="$description" \
-DateCreated="$year:01:01" \
-GPSLongitudeRef=E \
-GPSLongitude=$longitude \
-GPSLatitudeRef=N \
-GPSLatitude=$latitude \
-GPSAltitude=$elevation \
-GPSAltituderef="Above Sea Level" \
-City="Sarajevo" \
-Country="Bosnia and Herzegovina" \
-CountryCode="3166-2:BA" \
$1
You can use the script from the command line, or you can drag-and-drop pictures onto it (this procedure varies in different Linux distros, we’ll go over the use in Ubuntu).
Setup:
Install Exiftool from the command line: sudo apt-get install libimage-exiftool-perl
Copy and paste the script into a text editor, change the parameters to suit your needs and save as exifmod.
Right click the script and enable executable privileges in the file properties or execute chmod +x exifmod from the command line.
Create an application launcher and point it to the location of the script. In case of exifmod saved on your desktop this would be /home/yourusername/Desktop/exifmod.
Enable executable privileges for the launcher file as well.
Usage:
Drag and drop an image onto the launcher. Follow the prompts in the pop-up console window. Skip properties by leaving the answers blank and pressing enter. You can obtain the longitude and latitude of the photo location from Google Maps.
To verify the embedded metadata from the command line use: exiftool -All sampleimage.jpg.
To better understand how to protect yourself from people who may compromise your wireless network we need to learn what they do in order to get inside.
To protect yourself from a breach you must think like a hacker. Chances are slim but the intruder may not be your first door neighbor at all. A hacker with a powerful high gain WiFi antenna could be sitting hundreds of meters away and siphoning off your internet connection.
Two basic things can happen:
An intruder can log into your network and use the Internet connection.
An intruder can log into your wireless access point (AP) and modify the settings to better suit his needs.
Scenario 1
Let’s examine the first of the two possibilities. Wireless routers come without any security enabled by default. This is understandable. You need to connect to your router for the first time without the password before you can create one.
If you don’t set the security settings and don’t create a password your wireless network will remain unlocked so anyone can connect to it. The intruders can not compromise your computer(s) easily but they can use your Internet connection.
This may not be a big deal. I typically leave one of my networks open for anyone in the neighborhood to connect to. I live in a working class neighborhood and don’t mind local kids who can’t afford their own Internet service.
On the other hand when you realize that a bunch of people are hogging your speed by downloading crappy YouTube videos you may want to enable security and prevent unauthorized access.
When you decide to do that use WPA instead of WEP. It is a newer and more secure standard. The way you actually implement the security will depend on your wireless router and your computer’s operating system (Windows Vista, XP, Mac, Etc.) The documentation you received with the router will describe the whole process in detail. A strong password will deny hackers the opportunity to log into your network, use the Internet and make changes to your setup.
Scenario 2
There is another weak point a hacker may exploit when WPA or WEP security is disabled. Your wireless router can be wirelessly controlled via a web browser. This is a great feature that allows you to adjust router settings from anywhere within your house.
The problem is that after the initial router setup majority of people do not change the default router password leaving the device accessible to a hacker. Changing the default password is easy to do in your router’s control panel. Most wireless routers ship with IP address 192.168.1.1. When you type these numbers into your browser you will be taken to the router’s settings panel which is nothing more than a webpage generated by the router.
This webpage will prompt you for a user name and password. If you have the documentation that came with the router the default IP address, user name and password will all be listed there. For example Linksys WRT54G router can be accessed by using these factory defaults:
IP: 192.168.1.1
user name: admin
password: admin
Leaving these three values at their factory defaults is like leaving your car unlocked and running. Changing the IP address but leaving the user name and password at their default setting is a weak form of protection.
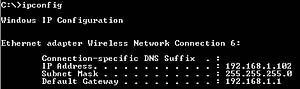
Fig. 1 Using IPCONFIG to obtain router’s IP address
The IP address can easily be obtained by executing IPCONFIG command in Windows command line while connected to the WiFi network. The IPCONFIG command will return the “Default Gateway” IP address. This is the router’s home address [Fig. 1].
Knowing which router brand you have is sometimes enough for a hacker to obtain login information. There are many websites that list default passwords.
What’s a big deal if someone enters your wireless router settings? They could do a number of things.
For example, they could boot you off your own Internet connection by implementing WPA security. They would have the password, you would not. However, this is an extremely visible intrusion that most Internet subscribers would react to immediately.
They could enable the log to track what websites you visit. Of course, this in itself is of little use to a hacker and there are better ways to obtain detailed information about your Internet activities.
They could decrease the amount of bandwidth allocated to your computers while allowing maximum throughput for themselves. This would allow the hacker to choke your speed while he can enjoy full broadband capabilities.
But there is something more sinister. A skilled hacker could completely hijack your router while allowing you to access the Internet through his router at decreased speeds. There’s a chance you’d never know this happened because you’d still have uninterrupted net access albeit at lower speeds. Let’s look at this idea in more detail.
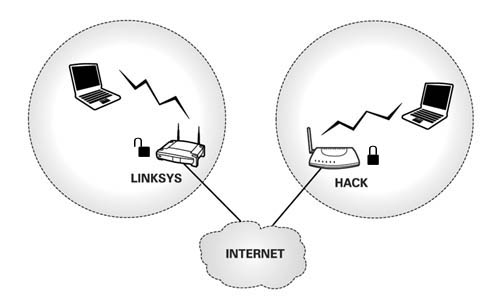
In a “friendly neighbor” scenario both you and the hacker have their wireless routers that are used to connect to the internet. Let’s pretend that your SSID is “Linksys” and the hacker’s SSID is “Hack.” Every time you log into your network you see the name of your router and the name of your hacker neighbor’s router [Fig. 2].
Fig. 2 Each neighbor uses their router to connect to the Internet
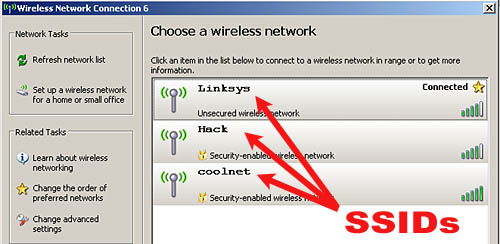
Your computer uses something called SSID to identify and differentiate between all available wireless networks. Each wireless router broadcasts one SSID (it’s possible to suppress the SSID broadcast but this is another subject) and your notebook computer looks for the SSID when connecting to the wireless network [Fig. 3]. SSID can be seen as the name of a network. It can be the default name the router came with or it can be any name you create in the router’s control panel.
Fig. 3 These are the SSIDs
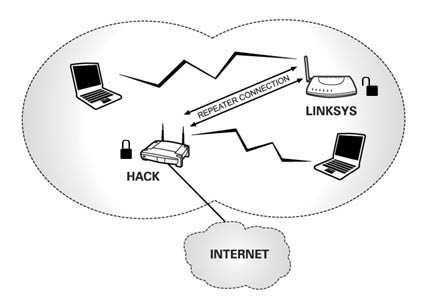
The hacker can swap out the SSID’s of your and his router so you become “Hack” and he becomes “Linksys.” This is simple enough to do in the routers’ control panels. After this is done the intruder could setup his router to work as a repeater and enable WPA security on your router. At this point the hacker may as well cancel his broadband internet subscription.
What does all this do? Let look at it [Fig. 4]. The “Linksys” router that your computer always logs into is really not your own router any more. It is the hacker’s router. You log into his router thinking it’s yours and because his router is setup to repeat your WiFi you can still get out on the Internet and may never notice any difference. The hacker on the other hand is accessing your router which has been renamed to “Hack.”
Hacker enjoys the full benefits of a secured WPA connection which would otherwise be unavailable had he been just plain logging into your router without all this extra gymnastics. By filtering out all other neighborhood users except for you he doesn’t take chances of someone else using the connection. You on the other hand are still happy go lucky and will never know something is going on unless the hacker has intentionally limited your speed so he can have faster downloads.
Fig. 4 Swapped SSIDs. Another neighbor has been hacked.
What we can learn from these two examples is that leaving default passwords and leaving your WiFi connection unprotected can be a bad idea. Still, the chances that someone is leeching off your connection are limited at best.
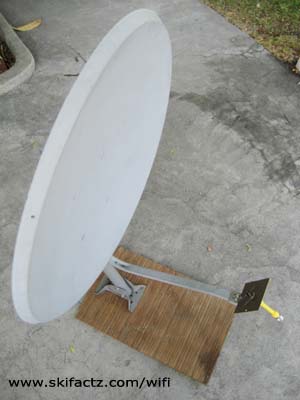
A satellite dish is a powerfull signal booster when used in combination with a WiFi biquad antenna. I see lots of satellite dishes laying in trash when driving. Grab one next time you see an old dish laying on the sidewalk.
I have tried using both smaller Dish Net dishes and larger 76cm (30 inch) dishes [Fig. 1].
They both work well. The larger dish will give you some extra gain but even the small one works really well. How far you can go with this booster?
I have tested it up to 250m (820 feet) with Netgear router on the other end and it worked flawlessly. The router was using the stock antenna it came with.
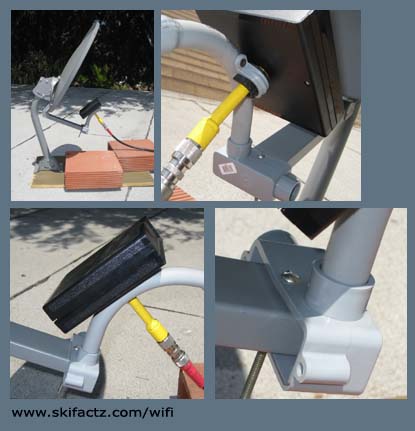
First disconnect the so called LNBF from the dish [Fig 2]. Then mount your biquad antenna in place of the LNBF. Ideally, it should be in the exact same position as this is the focal point of the parabolic dish.
Fig. 2 Dish 500 and LNBF
Fig. 3 Unprotected biquad antenna will corrode outdoorsFig. 4 This antenna was housed inside an enclosure and it did not corrode
You can mount the “naked” biquad [Fig. 3] or place it in an enclosure first which will protect it from weather [Fig. 4].
The actual rigging method is something you’ll have to decide based on the materials you have. I tried mounting the antenna directly to the arm of the dish [Fig. 3].
This method works well but all exposed copper pieces will oxidize quickly. In addition, an exposed antenna can be easily damaged should the dish lose footing.
A better way is to house the antenna in an enclosure and mount it using a support made of PVC electrical conduit pieces [Fig. 5].
This method was useful on a Dish Net parabolic dish to elevate the position of the antenna. Dish Net dishes have a chunky LNBF that sits up high. Anything you can do to lift the position of your antenna and make it close to where LNBF sits will help.
Fig. 5 Mounting biquad antenna on Dish 500
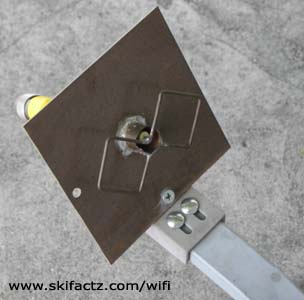
Make a provision to rotate the antenna 90 degrees [Fig 6]. The ability to rotate 90 degrees will allow you to match the polarization of the distant antenna you’re connecting to.
Fig. 6 Biquad antenna polarization
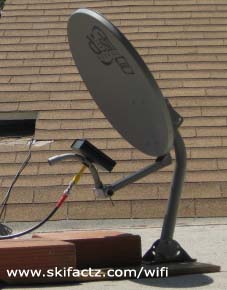
Fig. 7 Dish 500 fitted with WiFi antenna looking down
All satellite dishes are designed to point up to the sky.
Even when the dish is seemingly 90 degrees to the ground it is still looking up. To properly aim the beam you will need to point the dish down [Fig. 7].
If you are on a hill you will need to point down even more.
Now it’s only a matter of fine tunning the position of the dish. Using a free tool like Netstumbler is a good way to aim your dish properly. Once you lock the maximum signal tighten the screws on the dish and rotate the antenna 90 degrees. One of the two polarization positions will give you stronger reception.
Securing the dish with bricks like I’m doing in this picture is a very bad idea. Winds can easily knock the dish down or lift it off your roof. Use something heavy to hold the dish down while locating a good spot to place it. Once you find the spot mount the dish permanently with heavy screws.
Keep in mind that RF cable attenuates high frequency signal a lot. Keep the cable run at the absolute minimum or else all the signal gain of the antenna will be devoured by the cable.
If you don’t have a proper WiFi directional antenna, you could try mounting a USB wireless adapter on the dish instead.
Finally, there may be regulations determining maximum signal strength for 2.4GHz frequency in your country. In the United States FCC regulates such matters.
It is not likely that FCC would take any action unless they receive interference complaints from people or business in your signal path. Also, this setup is fairly limited and without powerfull amplification you will probably not bother anyone.
"
We use cookies to ensure that we give you the best experience on our website. When you comment on a post we collect your email address, but we don't share it with anyone. If you continue to use this site we will assume that you are happy with it.Ok